
When adding or changing specifications associated with the vehicle’s electronic control system, the coding parameters in the relevant ECUs must be changed on the Adaptation Code Entry screen. This figure shows a guide on how to use Xentry diagnostics to perform ECU parameter adjustment for FUSO .
Use the flowchart below to change coding parameters.
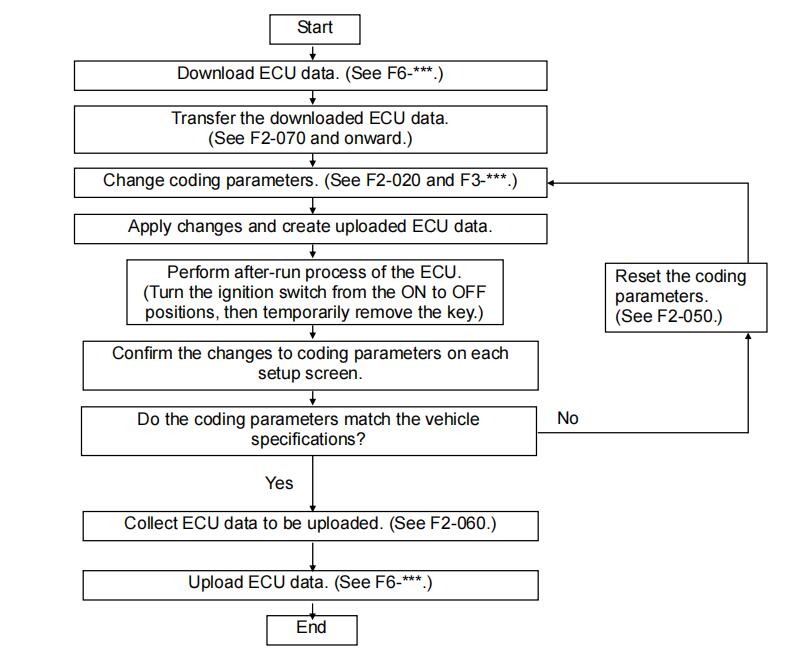
It is necessary to download the ECU data for the vehicle from the FRN before starting the coding work. The downloaded ECU data must be transferred to the PC (FUSO Diagnostics has been set up) using a USB memory. Only checking an encoding parameter value is possible on a standard string screen, and changing encoding parameter values is possible on a manual settings screen.
We recommend that you take a screenshot before changing the encoding parameters. (Useful for checking after running the tracking process.) After changing the coding parameters, select Apply changes, create uploaded data, and then run the controller tracking process for the changes to take effect on the controller. After running the tracking process, if it is determined that ECU coding parameters have been changed to incorrect values, it can be restored to the state before the change by resetting the coding parameters on each setup screen.(See F2-050 “Resetting Code Entry (Coding)”.) When coding parameters have been changed, it is necessary to upload the new ECU data to the FRN.
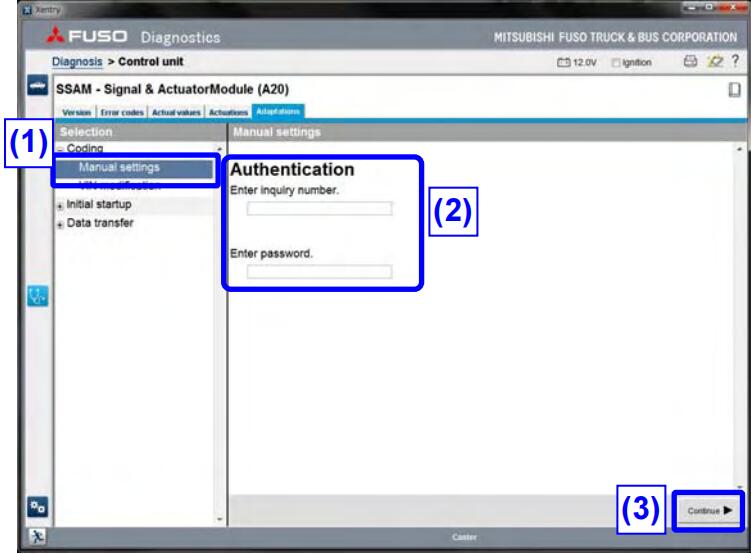
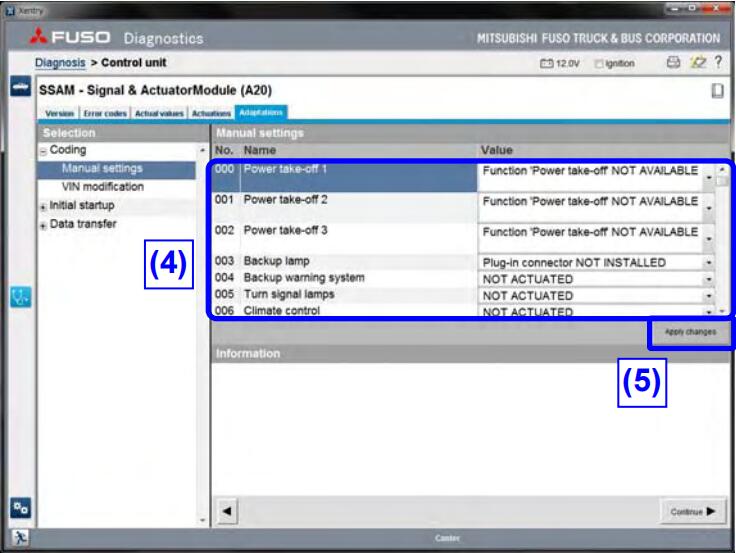
Change Coding Parameters Use this function when changing the coding parameters of the ECUs manually.
(1) Select Manual Settings.
(2) Enter the request number and password that you received from the FRN. (Be sure to capitalize the alphabetical part of the case number. )
(3) Click Next. If incorrect data was entered in (2) or the data downloaded from the FRN was not transferred to the PC, one of the following screens will appear.
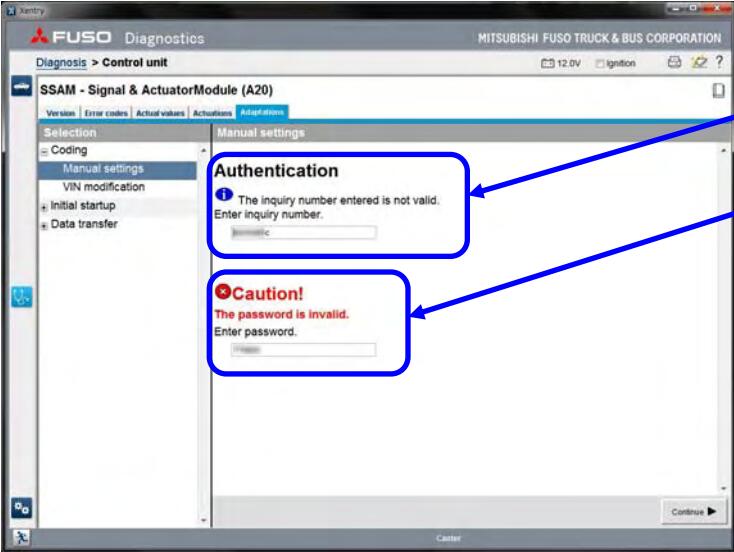
Error indication after entry
If small letters were entered for the inquiry number
If an incorrect password (including outdated password) was entered
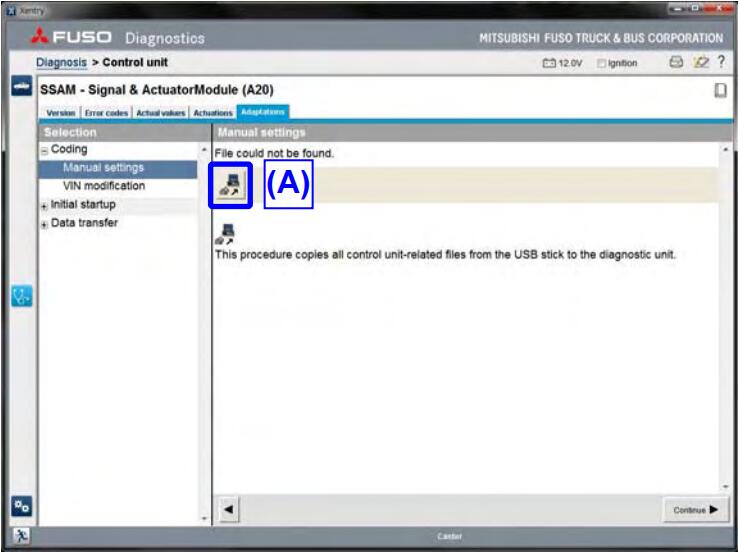
If downloaded data has not been transferred to the PC, the screen shown on the left will be displayed.
(A) Insert a USB storage device containing data, then click this button to move to the inquiry number entry screen. Copying of data starts when the inquiry number is entered.
(4) Change parameters. (The setting items vary depending on the changes to the vehicle specifications.
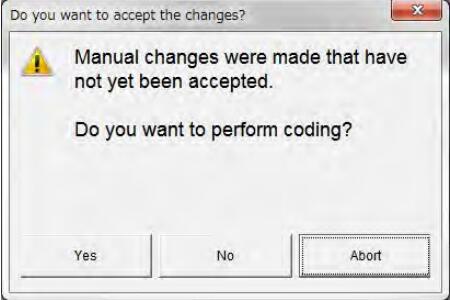
If “Apply changes” is selected, the following screen will appear. If a parameter is changed, the letters will change from gray to black and the button will be activated)
Select “Yes”: The change is applied and the previous screen appears.
Select “No”: The previous screen appears without applying the change.

If you attempt to move to other screen (including exiting FD) without selecting “Apply changes” in step (5), the left message will be displayed.
Select “Yes”: The change is applied and the previous screen appears.
(FD is terminated after applying the change if Quit FD was selected.)
Select “No”: Changes are deleted and the screen changes. (FD is terminated if Quit FD was selected.)
Select “Abort”: Screen change (including exiting FD) is aborted and the previous screen appears.
(6) When this message is displayed, the coding of a parameter and generation of an upload file are ends.
(7) Quit FD and perform after-run process of the ECU. (Turn the ignition switch to the OFF position and remove the key. Wait for about 1 minute, and then turn the ignition switch to the ON position again.)
(8) Restart FD and check if coding parameters are not changed incorrectly on each setting screen (screens where coding parameters were changed). If coding parameters were changed to incorrect values, reset the coding parameters. Then, perform code entry again from step (4).
・ As a post process, upload the ECU history data to the FRN