
New Holland has recently introduced an upgrade to the AdBlue in-line filter kit, along with the installation of a vent line filter to the AdBlue tank. This upgrade aims to address the issues related to blockages in the previous AdBlue filtration system, which could result in error codes and low pressure in the AdBlue system. In this article, we will discuss the importance of this upgrade, its benefits, and provide step-by-step instructions for the installation process.
The information in this Service Bulletin advises of:
An upgrade to the AdBlue in-line filter kit
AND
The installation of a vent line filter to the AdBlue tank
The previous AdBlue filtration system is prone to blockage. If a blockage occurs, the below error code may appear on the display screen:
On CX series combines and CR series combines:
E-0907-07
SCR007
1757-03
CX5000 Tier 4A combines and CX6000 Tier 4A combines
E-1916-07
DTC7C
Alarm DCU007
Related Contents:
2023 CNH EST 9.9 9.2 New Holland Diagnostic Software Free Download
CNH DPA5 Diagnostic Kit
CNH eTimGo Offline
NOTE: In some cases, the engine will enter the de-rate mode.
The above error codes result from low pressure in the AdBlue system. In most cases, the low pressure is due to debris in the AdBlue system. This debris can lead to blockage of:
A breather line in the AdBlue system
One of the filters in the AdBlue system
For production:
To overcome these concerns NEW HOLLAND introduced the below updates on Tier4B flagship combines and Midrange combines:
The installation of a filter on the vent line of the AdBlue tank.
NOTE: Previously on Tier 4A combines, the vent line was open to the atmosphere so debris could enter into the AdBlue system at this point.
The Introduction of a larger in-line filter on the suction line between the AdBlue tank and the Dosing Control Unit (DCU).
NOTE: This larger in-line filter has a much longer service interval than the previous in-line filter on tier 4A combines.
For service:
To overcome any service concerns NEW HOLLAND introduced the below updates for use on Tier4A combines:
A filter with associated hardware for the vent line of the AdBlue tank.
A service kit 48041490 to retrofit the larger in-line filter onto Tier4A combines.
SERVICE
Unit preparation
NOTE: The four reference points to the unit are the left-hand side, the right-hand side, the front of the unit, and the back of the unit. These reference points apply to someone that faces the direction of travel from a standing position that is behind the unit.
WARNING
Avoid injury!
Before you start any work on the unit, prepare the unit according to the following instructions.
Failure to comply could result in death or serious injury.
Thoroughly clean the area on the unit that pertains to the service instructions for this Service Bulletin.
Park the unit on a hard, level surface.
Apply the parking brake.
Completely lower any attachments to the ground.
Relieve all of the hydraulic system pressure.
Shut down the engine.
Remove the ignition key.
Follow any specific instructions that pertain to the unit within the service instructions as necessary.
Service instruction
NOTE: If a combine has debris in the AdBlue system NEW HOLLAND recommends that you remove the AdBlue tank and flush it out completely with warm water.
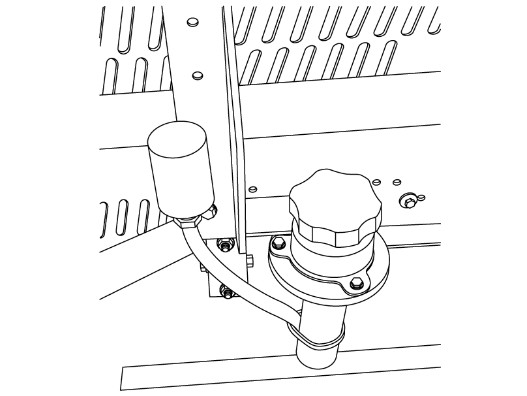
To install the larger in-line filter on the suction line between the AdBlue tank and the DCU:
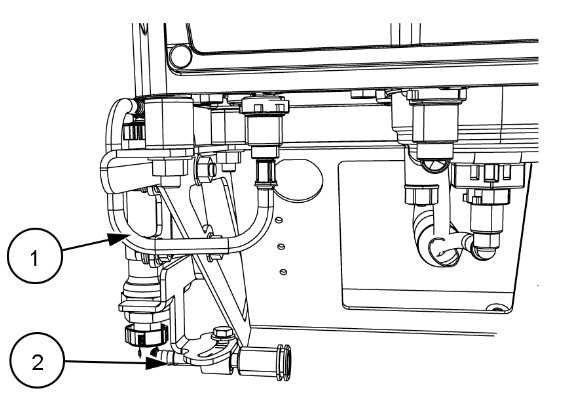
1 Install the hoses (1) and (2) onto the in-line filter (3).
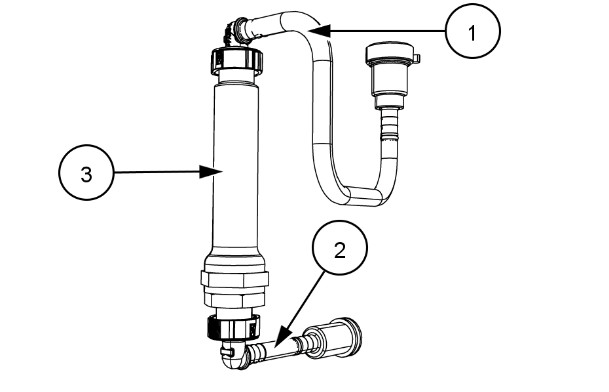
2 Use the two ‘P’ clips (4) to install the filter assembly onto the bracket (5).
3 Use the ‘P’ clip (6) to secure the hose (2) onto the bracket (5).
NOTE: Install the ‘P’ clips onto the bracket with the hardware:M6x16 bolt, M6 Nut and two M6 Belleville washers.
NOTE: For CX6090 combines, install the M6 bolts opposite to the direction that Figure 2 depicts. This action will avoid interference between the bolt and the DCU frame.
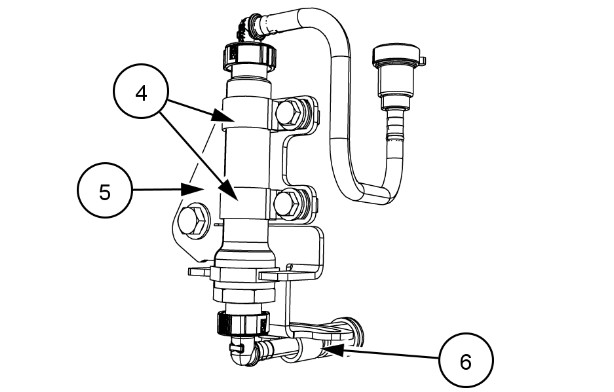
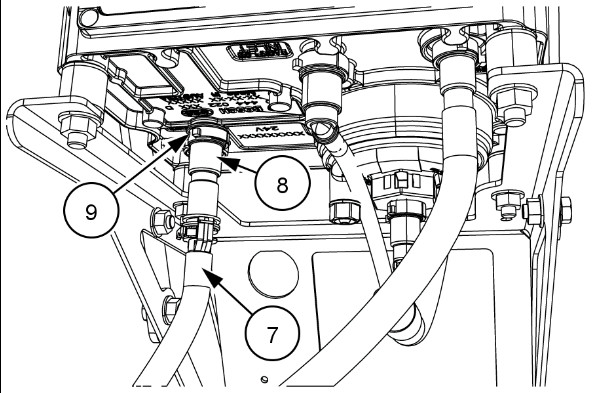
4 Disconnect the hose (7) from the existing in-line filter (8).
5 Disconnect the existing in-line filter (8) from the bottom of the DCU (9).
6 Remove the bolt (10) from the safety bracket (11) on the DCU support.
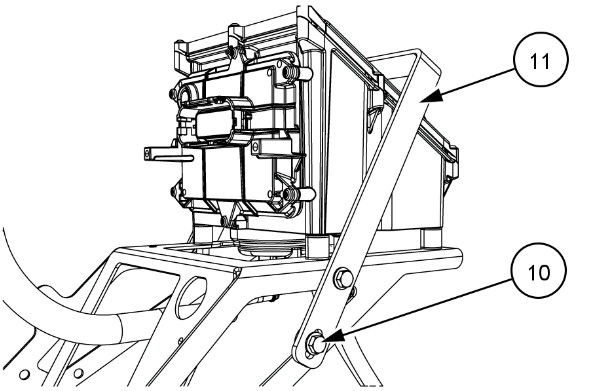
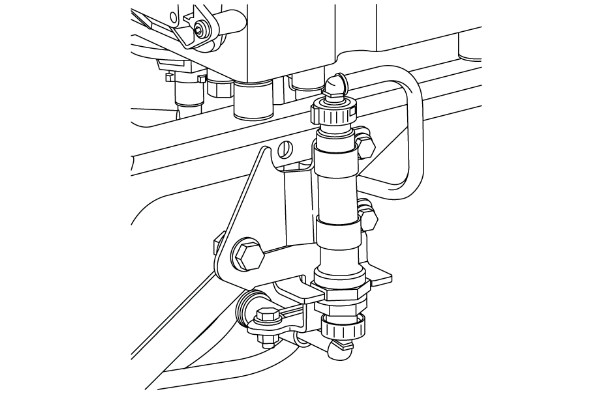
7 Use the bolt (10) to install the new filter assembly onto the DCU support, as Figure 5 depicts.
NOTE: Use the hardware: M8x25 bolt with M8 nut and two Belleville washers.
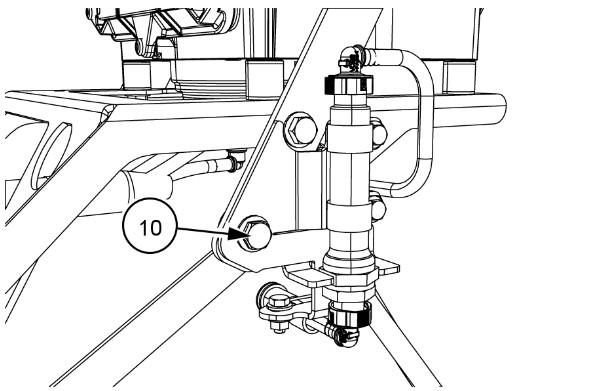
NOTE: CX6090 has a slightly different bracket for mounting the new filter assembly, as Figure 6 depicts.
8 Connect hose (1) to the suction inlet of the DCU.
9 Connect hose (2) to the existing suction hose from the AdBlue tank. See Figure 3 (7).
To install the filter on the vent line of the AdBlue tank on CR series Tier 4A combines:
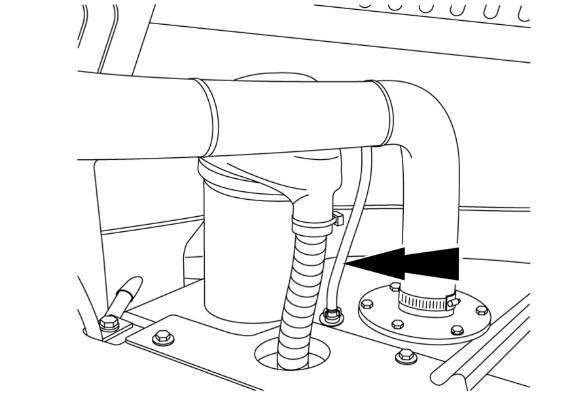
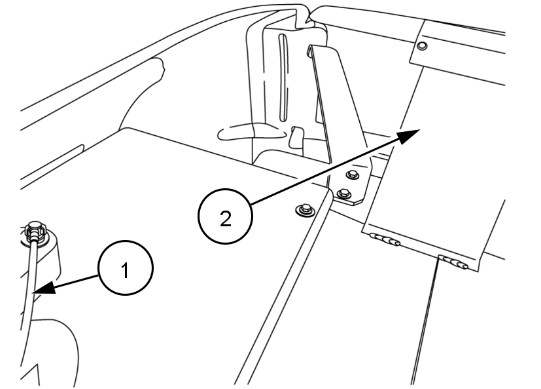
1 Cut the existing vent line 50 – 100 mm (2 – 4 in) from where it is connected to the AdBlue tank, as Figure 8 depicts.
2 Slide one end of the new larger diameter hose over the existing vent line.
3 Secure the larger diameter hose with a hose clamp.
4 Slide the hose clamp onto the other end of the larger diameter hose.
5 Install the filter onto the open end of the hose.
6 Use an M8 bolt with a spacer and an M8 nut to attach the filter retaining clamp somewhere on the engine deck.
NOTE: You MUST mount the filter above the height of the filler neck, as Figure 9 depicts.
To install the filter on the vent line of the AdBlue tank on CX series Tier 4A combines:
Cut the existing vent line 50 – 100 mm (2 – 4 in) from where it is connected to the AdBlue tank, as Figure 8 depicts.
Slide one end of the new larger diameter hose over the existing vent line.
Secure the larger diameter hose with a hose clamp.
Cut the hose to the correct length so that you can install the filter with a Zip tie just above the filler neck.
NOTE: Use the existing Zip tie base that fixed the old vent line.
To install the filter on the vent line of the AdBlue tank on CX 5000 series Tier 4A combines and CX 6000 series Tier 4A combines:
Cut the existing vent line 50 – 100 mm (2 – 4 in) from where it is connected to the AdBlue tank (1) , as Figure 10 depicts.
Slide one end of the new larger diameter hose over the existing vent line.
Secure the larger diameter hose with a hose clamp.
Slide the hose clamp onto the other end of the larger diameter hose.
Install the filter onto the open end of the hose.
Use an M8 bolt with a spacer and an M8 nut to attach the filter retaining clamp somewhere on the engine deck.
NOTE: You MUST mount the filter above the height of the filler neck, as Figure 10 depicts.
NOTE: To mount the filter you must drill a 9 mm hole (2) in the rear shield support on the straw hood.
More repair cases for New Holland machine,please refer to:New Holland Trouble Repair