The chassis angle sensor is an important component in JCB Pilemaster machines, as it helps to accurately measure the angle of the chassis and mast. If you need to replace the chassis angle sensor (728/E2897) on your JCB 3CX, 4CX, or 5CX machine, you can easily configure the new sensor through the rear display service menu. In this article, we will guide you through the step-by-step procedure to configure the chassis angle sensor without the need for any additional tools or diagnostic equipment.
Related Contents:
2024 JCB ServiceMaster 4 v24.1.1 Free Download for Win 10 Win11
JCB Electronic Service tool
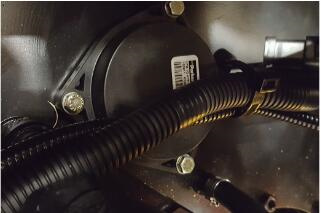
Before you begin the configuration process, make sure that the machine’s ignition is turned OFF and that the mast angle sensor is disconnected. You can locate the mast angle sensor using the diagrams provided in this article. Also, ensure that all emergency stop buttons are in the ‘out’ position and have not been pressed.
Once you have completed these preliminary steps, follow the instructions below to access the rear display service menu:
1. Turn the machine’s ignition ON.
2. Wait for the rear display to turn ON and show the drill information screen. If the rear display does not switch ON, double-check the emergency stop buttons.
3. Press and hold both the F1 and F2 buttons.
4. After 5 seconds, while still holding down the F1 and F2 buttons, press the OK button.
5. The display should now show the service menu.

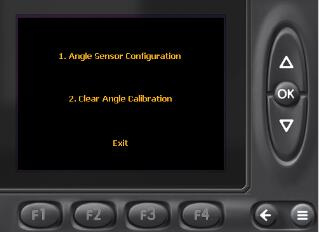
In the service menu, you can navigate through the options using the UP and DOWN arrows. To select an option, press the OK button. If you wish to exit the menu, select “exit” and press the OK button.
To configure the chassis angle sensor, follow these steps:
1. Select “angle sensor configuration” from the menu and press the OK button.
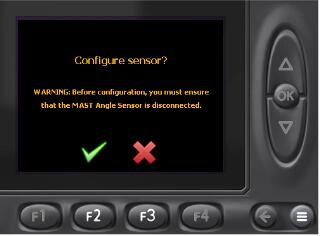
2. A confirmation screen will appear, stating that the mast angle sensor must be disconnected before continuing.
3. If the mast angle sensor has been disconnected, press the F2 button to proceed with the chassis angle sensor configuration. Pressing the F3 button will abort the process.
4. Once the sensor has been configured (or if the process has been aborted), the display will return to the service menu screen.
5. Exit the service menu screen and turn off the machine’s ignition.
6. Re-connect the mast angle sensor.
After completing the configuration process, it is essential to check the operation of the angle sensors. Follow the steps below to ensure the sensors are functioning correctly:
1. Turn the machine’s ignition ON and start the engine.
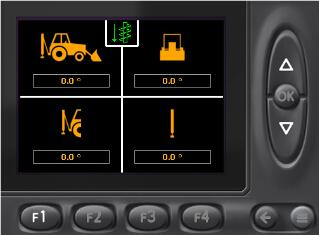
2. Change the display from the drill information screen to the angle information screen using the UP or DOWN button.
3. Extend the stabilizer legs to their full extension. The upper two segments on the display will react to changes in angles from the chassis angle sensor.
4. Move the boom up and down. The lower two segments on the display will react to changes in angles from the mast angle sensor.
5. Once you have confirmed that the angle sensors are operating correctly, return the drill end to the ‘travel’ position and retract the stabilizer legs fully.
6. Turn off the engine.
By following these steps, you can easily configure the chassis angle sensor on your JCB 3CX, 4CX, or 5CX machine. It is crucial to ensure the proper functioning of the angle sensors to maintain the accuracy and safety of your machine’s operation.
More repair case for JCB,please refer to:JCB Trouble Repair